Setup your WordPress Blog with Feedburner
 Haris.tv is now fully Feedburned! I’m gonna share the setup I’ve used and hope that it will provide some time saving tips for anyone who wants to do the same.
A summary of the steps I’m going to cover
1. Register with Feedburner (free)
2. Setup one Autodiscovery feed
3. Redirect requests for old feed using FeedSmith Plugin
4. Add chicklets to your site.
OK then, I hope you’re sitting comfortably, away we go!
1. Register with Feedburner top
 WordPress’s default setup includes RSS2/Atom Feeds. This is fine but burning your feed with Feedburner gives you a whole array of benefits. It’s free to use and registration is quick.
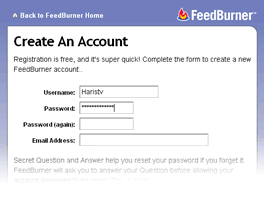 Simply head over to Feedburner.com and click the register link at the top of the page.
The form asks you to provide a username, password, email address and a secret question in order to retrieve your password should you ever forget it.
Once you’re done click Sign In.
 You should now find yourself in the myFeeds page.
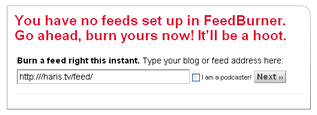
Enter the address of your original RSS feed in the textbox.
This should be something like ‘http://yourblog/?feed=rss2′ or ‘http://yourblog/feed/’ (you might want to type the address in a browser to test it first)
When you’ve clicked next you should get the following dialogue:
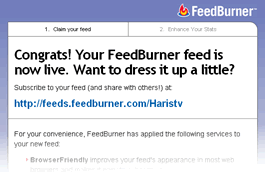
Don’t close the feedburner browser window just yet, you still have some things to do in the following sections.
2. Setup ONE Autodiscovery feed top
There are two main feed formats. RSS and Atom. Unfortunately some feed readers only cater for one format which means that in order to ensure compatibility with ALL readers you need to offer both. Wouldn’t it be great if we could have one smart feed that reformats itself based on the reader?…
2.1. Activate Feedburner’s SmartFeed
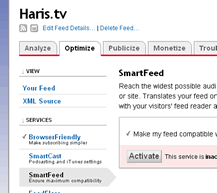 Feedburner’s SmartFeed feature takes the original feed and spits out a format that is reader dependant… on the fly! Let’s set that up.
In the manage feed section click on the optimize tab. From the services menu on the left, click SmartFeed.
Click the Activate button. You should see a confirmation.
Make a note of your new Feedburner feed address (http://feeds.feedburner.com/yourFeedName).
Test the address in a browser window to see that it’s working.
2.2. Edit your template header
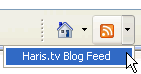
Autodiscovery is a feature whereby a browser automatically discovers a feed that’s present due to it’s link declaration between the html head tags. If a browser ‘autodiscovers’ a feed it displays it in it’s toolbar. Firefox displays a notice in it’s address field  . IE activates it’s feeds on this page button.
 .
.
You now need to edit your WordPress header template so that the new Feedburner feed replaces your current WordPress feed(s).
Find the file that contains your header html in your wordpress installation (commonly /wp-content/themes/yourActiveTheme/header.php)
Open the file in your favourite editor and look for lines that resemble any of the following two:
<link href="http://yourblog/?feed=rss2″ rel=”alternate” type=”application/rss+xml” title=”RSS 2.0″ />
<link rel="alternate" type="application/atom+xml" title="Atom 0.3" href="http://yourblog/?feed=atom” />
You need to replace ALL lines you’ve discovered with a single declaration for your new Feedburner feed, like so;
<link rel="alternate" type="application/rss+xml" title="A Label for your feed” href=”http://feeds.feedburner.com/yourFeedName” />
Save your changes and then open a browser and click your browser equivalent RSS button to check that the autodiscovery is working and displaying (only) your new Feedburner feed.
For Firefox:

For Internet Explorer:
3. Redirect requests for old feed using FeedSmith Plugin top
Even though you now have a shiny new feed from Feedburner and you’ve covered autodiscovery there’s nothing stopping people from subscribing to your old feed. Let’s fix that now by using the great FeedSmith WordPress plugin that will forward all requests for the old feed address to the new Feedburner address.
 - Download the FeedSmith plugin and install/activate in the usual way.
(click here for full instructions)
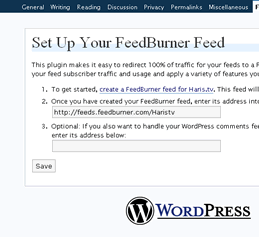
- In the admin area, click Options then FeedBurner FeedSmith sub-option.
- Enter your Feedburner address into the first textfield and click Save.
(you also have the option to create and provide a comments feed, but this is beyond the scope of this guide)
4. Add chicklets to your site top
Chicklets are simply linked icons that can be placed on your site to notify users of your feed.
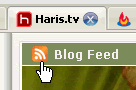 I currently have one in the top left corner of Haris.tv. Users can simply click this to access subscription options.
Feedburner.com provides an easy method to create these. Log into your feedburner account, select your feed from myFeeds and then click on the publicize tab.
Click on Chicklet Chooser from the menu on the left and follow the instructions.
You’re Done!
Finally, for those of you that would like to see subscriber stats in your WordPress Admin area without having to log into Feedburner.com, I recommend Joe Tan’s excellent wordpress reports plugin.
Hope that helps, as always feedback is appreciated!
Return to: Setup your WordPress Blog with Feedburner
Social Web